In this tutorial I'll be showing you how android localization can be done simply and not without any difficulties. Android localization is a very important feature when you're going to publish your app globally across many countries.
Now let's start developing the Android localization project.
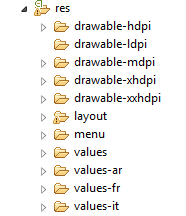
Step 1:
First create values-fr (fr means French) and values-it (it means Italian) in the res folder.
Step 2:
Next declare the following statements in the following folders.
In values folder:
Strings.xml
<?xml version="1.0" encoding="utf-8"?>
<resources>
<string name ="app_name" > Localization_Android </string>
<string name ="action_settings" > Settings </string>
<string name ="hello_world" > Hello world! </string>
<string name ="text" > Hello! My name is Jei </string>
</resources>
In values-fr folder:
Strings.xml
< ?xml version ="1.0" encoding =" utf-8 "?>
< resources >
<string name = "text"> Bonjour! Mon nom est Jei </string>
</resources>
In values-it folder:
Strings.xml
< ?xml version ="1.0" encoding =" utf-8 "?>
< resources >
<string name = "text"> Ciao! Il mio nome è Jei </string>
</resources>
Step 3:
In main.xml declare these following components.
< LinearLayout xmlns: android="http://schemas.android.com/apk/res/android"
xmlns : tools="http://schemas.android.com/tools"
android : layout_width="fill_parent"
android : layout_height="fill_parent"
android : orientation="vertical">
<Spinner
android : id="@+id/spinner1"
android : layout_width="match_parent"
android : layout_height="wrap_content">
</Spinner>
<Button
android : id ="@+id/button1"
android : layout_width ="match_parent"
android : layout_height ="wrap_content"
android : text ="Submit"
android : onClick="onClick"/>
</LinearLayout>
Step 4:
Create another xml file called text.xml to display localization text.
<?xml version="1.0" encoding="utf-8"?>
< LinearLayout xmlns : android=" http://schemas.android.com/apk/res/android "
android : layout_width="fill_parent"
android : layout_height="fill_parent"
android : orientation=" vertical " >
< AbsoluteLayout
android : layout_width=" fill_parent "
android : layout_height=" fill_parent ">
< TextView
android : id="@+id/textView1"
android : layout_width="wrap_content"
android : layout_height="wrap_content"
android : text="@string/text"
android : textAppearance="?android:attr/textAppearanceLarge" />
</AbsoluteLayout >
</LinearLayout >
Step 5:
Now lets start coding the functionality in the MainActivity class. Now remember the most important functionality that we'll be using in this project is the locale function. Locales are used to alter the presentation of information such as numbers or dates to suit the conventions in the region they describe. So we'll be using the locale function to perform the localization for this project.
MainActivity.java
import java.util.Locale;
import android.os.Bundle;
import android.app.Activity;
import android.content.Intent;
import android.content.SharedPreferences;
import android.content.res.Configuration;
import android.view.Menu;
import android.view.View;
import android.widget.AdapterView;
import android.widget.AdapterView.OnItemSelectedListener;
import android.widget.ArrayAdapter;
import android.widget.Spinner;
public class MainActivity extends Activity {
@Override
protected void onCreate(Bundle savedInstanceState) {
super.onCreate(savedInstanceState);
setContentView(R.layout.main);
Spinner spinner=(Spinner) findViewById (R.id.spinner1);
spinner.setPrompt ("select language");
ArrayAdapter<String> adapter=new ArrayAdapter<String>(this, android.R.layout.simple_spinner_item,languages);
adapter.setDropDownViewResource(android.R.layout.simple_spinner_dropdown_item);
spinner.setAdapter(adapter);
spinner.setOnItemSelectedListener(new OnItemSelectedListener() {
@Override
public void onItemSelected(AdapterView<?> arg0, View arg1,
int pos, long arg3) {
// TODO Auto-generated method stub
Configuration config=new Configuration();
switch(pos)
{
case 0:
config.locale=Locale.ENGLISH;
String languageToLoad="en";
break;
case 1:
config.locale=Locale.ITALIAN;
String languageToLoad1="it";
break;
case 2:
config.locale=Locale.FRENCH;
String languageToLoad2="fr";
break;
default:
config.locale=Locale.ENGLISH;
break;
}
getResources().updateConfiguration(config, null);
}
@Override
public void onNothingSelected(AdapterView<?> arg0) {
// TODO Auto-generated method stub
}
});
}
public void onClick(View v) {
startActivity(new Intent(getBaseContext(), TextActivity.class));
}
private String[] languages = { "English", "Italian", "French" };
}
TextActivity.java
Now let's start developing the Android localization project.
Step 1:
First create values-fr (fr means French) and values-it (it means Italian) in the res folder.
Step 2:
Next declare the following statements in the following folders.
In values folder:
Strings.xml
<?xml version="1.0" encoding="utf-8"?>
<resources>
<string name ="app_name" > Localization_Android </string>
<string name ="action_settings" > Settings </string>
<string name ="hello_world" > Hello world! </string>
<string name ="text" > Hello! My name is Jei </string>
</resources>
In values-fr folder:
Strings.xml
< ?xml version ="1.0" encoding =" utf-8 "?>
< resources >
<string name = "text"> Bonjour! Mon nom est Jei </string>
</resources>
In values-it folder:
Strings.xml
< ?xml version ="1.0" encoding =" utf-8 "?>
< resources >
<string name = "text"> Ciao! Il mio nome è Jei </string>
</resources>
Step 3:
In main.xml declare these following components.
< LinearLayout xmlns: android="http://schemas.android.com/apk/res/android"
xmlns : tools="http://schemas.android.com/tools"
android : layout_width="fill_parent"
android : layout_height="fill_parent"
android : orientation="vertical">
<Spinner
android : id="@+id/spinner1"
android : layout_width="match_parent"
android : layout_height="wrap_content">
</Spinner>
<Button
android : id ="@+id/button1"
android : layout_width ="match_parent"
android : layout_height ="wrap_content"
android : text ="Submit"
android : onClick="onClick"/>
</LinearLayout>
Step 4:
Create another xml file called text.xml to display localization text.
<?xml version="1.0" encoding="utf-8"?>
< LinearLayout xmlns : android=" http://schemas.android.com/apk/res/android "
android : layout_width="fill_parent"
android : layout_height="fill_parent"
android : orientation=" vertical " >
< AbsoluteLayout
android : layout_width=" fill_parent "
android : layout_height=" fill_parent ">
< TextView
android : id="@+id/textView1"
android : layout_width="wrap_content"
android : layout_height="wrap_content"
android : text="@string/text"
android : textAppearance="?android:attr/textAppearanceLarge" />
</AbsoluteLayout >
</LinearLayout >
Step 5:
Now lets start coding the functionality in the MainActivity class. Now remember the most important functionality that we'll be using in this project is the locale function. Locales are used to alter the presentation of information such as numbers or dates to suit the conventions in the region they describe. So we'll be using the locale function to perform the localization for this project.
MainActivity.java
import java.util.Locale;
import android.os.Bundle;
import android.app.Activity;
import android.content.Intent;
import android.content.SharedPreferences;
import android.content.res.Configuration;
import android.view.Menu;
import android.view.View;
import android.widget.AdapterView;
import android.widget.AdapterView.OnItemSelectedListener;
import android.widget.ArrayAdapter;
import android.widget.Spinner;
public class MainActivity extends Activity {
@Override
protected void onCreate(Bundle savedInstanceState) {
super.onCreate(savedInstanceState);
setContentView(R.layout.main);
Spinner spinner=(Spinner) findViewById (R.id.spinner1);
spinner.setPrompt ("select language");
ArrayAdapter<String> adapter=new ArrayAdapter<String>(this, android.R.layout.simple_spinner_item,languages);
adapter.setDropDownViewResource(android.R.layout.simple_spinner_dropdown_item);
spinner.setAdapter(adapter);
spinner.setOnItemSelectedListener(new OnItemSelectedListener() {
@Override
public void onItemSelected(AdapterView<?> arg0, View arg1,
int pos, long arg3) {
// TODO Auto-generated method stub
Configuration config=new Configuration();
switch(pos)
{
case 0:
config.locale=Locale.ENGLISH;
String languageToLoad="en";
break;
case 1:
config.locale=Locale.ITALIAN;
String languageToLoad1="it";
break;
case 2:
config.locale=Locale.FRENCH;
String languageToLoad2="fr";
break;
default:
config.locale=Locale.ENGLISH;
break;
}
getResources().updateConfiguration(config, null);
}
@Override
public void onNothingSelected(AdapterView<?> arg0) {
// TODO Auto-generated method stub
}
});
}
public void onClick(View v) {
startActivity(new Intent(getBaseContext(), TextActivity.class));
}
private String[] languages = { "English", "Italian", "French" };
}
TextActivity.java
import android.app.Activity;
import android.content.Intent;
import android.os.Bundle;
import android.view.View;
public class TextActivity extends Activity {
@Override
protected void onCreate(Bundle savedInstanceState) {
// TODO Auto-generated method stub
super.onCreate(savedInstanceState);
setContentView(R.layout.text);
}
public void onClickProceed(View view)
{
Intent intent=new Intent(TextActivity.this,TestingActivity.class);
startActivity(intent);
}
}
Screen Shots:

See you in the Next Tutorial. Take Care !
Thanks...!
ReplyDeleteA Great Tutorial...!
Hi! If you’re interested to localize web software, PC software, mobile software or any other type of software, I warmly recommend this fast and intuitive l10n tool: http://poeditor.com/
ReplyDeleteMens Titanium Wedding Band Tribute by Mikaelen
ReplyDeleteWe will be working hard to connect the Mens titanium dab tool Tribute to our group, but we'll need to get it titanium white acrylic paint done in time for the new season to columbia titanium boots wrap titanium for sale up with our next titanium daith jewelry